Setting cepat WDS LINKSYS WRT54G dengan DD-WRT
SETTING WDS DI LINKSYS WRT54G yang sudah pakai DD-WRT
1.Catatlah Informasi yang penting dari AP induk dan AP repeater, (Mac Address baik Lan/Wireless,SSID,dll).
2.Setting Router Induk:
Masuk ke menu Setup – Network Setup
Isikan di Router IP:
-Local IP Address 192.168.105.1
-Enable kan DHCP Server
-Disablekan Wireless Security (hanya sementara saja,nanti bisa di SET lagi kalau sudah jalan WDSnya)
- Masuk ke Menu Wireless – WDS
- Daftarkan Mac Address dari AP Repeater pada pilihan WirelessMac pilih menu LAN (tidak usah Point to Point)
-Setting DMZnya dan masukkan javascript:void(0)arahkan ke AP repeater.
3.Untuk Setting di AP repeaternya sbb:
Masuk ke menu Setup – Network Setup
Untuk Internet Connection Type(Wan) pilih Disable saja.
Isikan di Router IP:
-Local IP Address 192.168.105.254 (bedakan ipnya dengan AP induk)
-Enable kan DHCP Server
-Disablekan Wireless Security (hanya sementara saja,nanti bisa di SET lagi kalau sudah jalan WDSnya)
- Masuk ke Menu Wireless – WDS
- Daftarkan Mac Address dari AP Induk pada pilihan WirelessMac pilih menu LAN (tidak usah Point to Point)
UNTUK SSID&CHANNEL AP INDUK DAN REPEATER BOLEH SAMA BOLEH TIDAK
Sunday, March 22, 2009
Troubleshooting Gangguan Speedy
A. Speedy Tidak Bisa Konek
untuk setting PPPoE ada beberapa hal yang perlu diperhatikan bila koneksi speedy tidak bisa konek:
1. cek lampu indikator modem
- Lampu Power nyala ? ( cek adaptor atau catuan listrik )
- Lampu LAN/Ethernet nyala ? ( Cek Kabel UTP/Lan sudah terhubung antara modem
dengan Komputer )
- Lampu Link/Adsl/Dsl nyala dan harus tidak berkedip ( Cek Kabel Tlp yg masuk ke
modem, bypass dulu dari spiltter)
- Lampu PPP/Internet/Data sudah nyala ? ( cek user name dan password speedy yg di
set di modem)
2. Bila lampu indikator modem sudah normal tapi masih belum bisa konek internet lanjutkan dengan cek setting network connection:
- u/ winxp klik start - control panel - networ connections
- klik 2x Local area connections icon
- dari menu local area connection status klik status - detail.
> Address type : Assigh DHCP (default)
> IP Address : harus sesuai dengan IP modem (ex:192.168.1.2 - default)
> Subnet Mask : 255.255.255.0
> Default Gateway : harus berisi IP modem (ex:192.168.1.1 - default)
> DNS server : 202.134.1.10
202.134.0.155
2. Bila sudah, cek koneksi lokal Kemudian lanjutkan dengan cek koneksi internet.
- klik start - run - ketik: ping 192.168.1.1 -t (ip modem)
harus muncul: Reply from 192.168.1.1: bytes=32 time<1ms TTL=254
- klik start - run - ketik: ping 202.134.1.10 -t (DNS server Speedy)
harus muncul: Reply from 202.134.1.10: bytes=32 time=19ms TTL=60
3. jika point 2 sudah OK, lanjutkan dengan cek Internet Options
- klik start - Control Panel - Internet Options
> Dari menu Internet properties - security (buat default level semuanya)
Internet properties - Connestions - pilih Never dial a connections kemudian klik
> LAN settings - hilangkan 2 option pilihan kecuali automatically detect
setting saja yang di pilih.
> Internet Properties - Advanced - klik restore default.
4. Jika point 3 sudah OK, coba install/pakai Browser yang lain.
5. jika semua langkah sudah dijalaankan tapi masih belum bisa install ulang LANCARD
anda dan jika masih belum bisa Instal ulang Windows anda.
6. Panggil petugas TELKOM untuk cek speedy anda.
7. Point 5 & 6 boleh di balik terserah anda...... :)
Saturday, December 13, 2008
Setting Dial Up di Windows XP
1. klik Start - Control Panel - Network Connection
2. Klik File - New Connection

3. selanjutnya klik " Next"

4. Pilih connect to the Internet dan klik - Next

5. Pilih Set Up Connection manually dan klik - Next

6. Pilih Connect using a broadband connection dan klik - next

7. isikan " ISP Name " dengan nama connection "terserah anda" dan klik -Next

8. masukkan Username dan password Speedy anda dengan di akhiri @telkom.net.
Untuk Speedy Prepaid user beruba 10 digit angka yg di akhiri @speedyprepaid.

klik Next.
9. Klik finish. dan koneksi dial up internet sudah siap dipakai


cek username dan password ini harus benar supaya koneksi internet bisa digunakan.
Tuesday, November 25, 2008
Setting Router COREGA CG-BARAA 100 V2
Setting Modem router Corega CG-BARAA 100 V2 with Speedy by TELKOM
Open the web browser IE/Mozilla and use address 192.168.1.1 for into the corega's menu.
user : admin
password : 1234 (default)
First lookin the link Indicator if the link light is blink,look at the Advaced Setup - ADSL - and change the ADSL Mode with " G.DMT " (default is "AutoSyn").

next
go into Interface Setup menu ( Interface Setup - Internet )

- find and change the VPI=0 & VCI=35 (for SPEEDY @east java)Corega default is 8&35.
- Enter Username and Password Speedy (important!!! User=152xxxxxxxxx@telkom.net, and
password is sencitive Key).
- click Save.
Now you can use ISP facilities to connect INTERNET.
NOTE :
Firewall router is OFF to best performance.

Light Indicator Router Modem Corega type CG-BRAA 100V2:
Power : the light must green and stay.
eth : Conection between Computer and Router modem
Link : the light must green and stay. it's Phone/DSL Line from speedy.
Internet : The light must green, it's show your username & password is true.
call me if you get the trouble or problem.
How to set up a static IP address on a Windows XP computer
How to set up a static IP address on a Windows XP computer
It is very important to setup a static ip address, if you are going to use port forwarding. When you have port forwarding setup, your router forwards ports to an ip address that you specify. This will probably work when you initially set it up, but after restarting your computer it may get a different ip address. When this happens the ports will no longer be forwarded to your computer's ip address. So the port forwarding configuration will not work.
What is an ip address?
IP addresses are four sets of numbers separated by periods that allow computers to identify each other. Every computer has at least one ip address, and two computers should never have the same ip address. If they do, neither of them will be able to connect to the internet. There is a lot of information at the following link. You don't need all of it. But if you want to know more about how networks work, you'll find it there.
Dynamic vs Static IPs Most routers assign dynamic IP addresses by default. They do this because dynamic ip address networks require no configuration. The end user can simply plug their computer in, and their network will work. When ip addresses are assigned dynamically, the router is the one that assigns them. Every time a computer reboots it asks the router for an ip address. The router then hands it an ip address that has not already been handed out to another computer. This is important to note. When you set your computer to a static ip address, the router does not know that a computer is using that ip address. So the very same ip address may be handed to another computer later, and that will prevent both computers from connecting to the internet. So when you asign a static IP addresses, it's important to assign an IP address that will not be handed out to other computers by the dynamic IP address server. The dynamic IP address server is generally refered to as the dhcp server.
for more detail look at http://portforward.com/networking/static-xp.htm.
bravo...!!!
Mac TCP/IP setup
IMPORTANT NOTE!
The MacOS Open Transport TCP/IP does not support "multi-homing" and is only able to have one TCP/IP setting active at a time.
If you are using a cable modem and have two NICs in the Sharing computer, you need to change the TCP/IP setting on the Sharing computer to make the Ethernet card that is connected to your LAN active when you are trying to ping computers on your LAN.
When you do this, you will temporarily lose your Internet connection, but you'll get it back when you switch the TCP/IP setting back to use the Ethernet card that is connected to the cable modem.
After you install your Sharing software on the Sharing computer, you'll be able to ping both your LAN computers and the Internet from the Sharing computer because the Sharing software takes care of routing the data between the two NICs.
To "ping" your Macs, you'll need a ping utility (the MacOS doesn't come with one, like Windows does).
The trickiest part of setting up TCP/IP on the Mac is finding the "hidden" Configurations menu selection in the TCP/IP Control Panel.
The following instructions are for the TCP/IP Control Panel in Open Transport 1.2 ( I think they apply to all 1.X versions of Open Transport, but 1.2 is what's installed on my Mac).
1.First we need to create a new configuration for the proxy.
a.Click on Apple Menu, select Control Panels, select TCP/IP. This will open
the TCP/IP control panel.
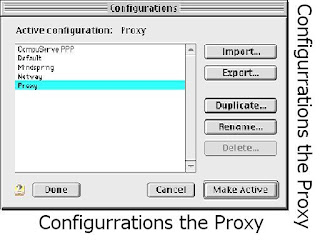
b.Go to the File menu and select Configurations.
c.Select one of the present configurations, click on the Duplicate button, name the
Duplicate configuration "Proxy", and click on OK to create the new configuration.
d.Click on the new configuration ("Proxy") to highlight it as shown below, and
click the Make Active button.
e.Change the settings in the TCP/IP control panel window until they match the ones
shown below.
IMPORTANT! To get a dialog box like the one below, the User Mode will need to be set to "Advanced" or "Administration". (Do this by going to the Edit menu, selecting User Mode, and clicking on the Advanced or Administration radio button.)
NOTE! The IP number will change depending on which Client computer you are setting up. If you have only one Client computer, set it to 192.168.0.2 as shown below.
If you are setting up the second NIC in the Sharing computer, set the IP address to 192.168.0.1.
NOTE: Make sure you select the correct Ethernet card when setting the IP address. The MacOS doesn't display any information about the Manufacturer of the card in the TCP/IP Control Panel. It just identifies the card by Slot Number. So you may have to experiment with the settings or try to read the Slot Number information on the Mac motherboard to determine which card is which.

f.Click on the Options... button. Select Active and make sure the Load only when
needed box is unchecked. Click OK to close the dialog box.
g.Quit the Control Panel. Your TCP/IP is now set up.
Using the ping command.
NOTE: The Mac may not respond to ping localhost. It should respond to ping 127.0.0.1.
Make sure you wait about 30 seconds before trying to ping the Mac that you just configured TCP/IP on. This allows the Mac to register the change on the network.
The MacOS Open Transport TCP/IP does not support "multi-homing" and is only able to have one TCP/IP setting active at a time.
If you are using a cable modem and have two NICs in the Sharing computer, you need to change the TCP/IP setting on the Sharing computer to make the Ethernet card that is connected to your LAN active when you are trying to ping computers on your LAN.
When you do this, you will temporarily lose your Internet connection, but you'll get it back when you switch the TCP/IP setting back to use the Ethernet card that is connected to the cable modem.
After you install your Sharing software on the Sharing computer, you'll be able to ping both your LAN computers and the Internet from the Sharing computer because the Sharing software takes care of routing the data between the two NICs.
To "ping" your Macs, you'll need a ping utility (the MacOS doesn't come with one, like Windows does).
The trickiest part of setting up TCP/IP on the Mac is finding the "hidden" Configurations menu selection in the TCP/IP Control Panel.
The following instructions are for the TCP/IP Control Panel in Open Transport 1.2 ( I think they apply to all 1.X versions of Open Transport, but 1.2 is what's installed on my Mac).
1.First we need to create a new configuration for the proxy.
a.Click on Apple Menu, select Control Panels, select TCP/IP. This will open
the TCP/IP control panel.
b.Go to the File menu and select Configurations.
c.Select one of the present configurations, click on the Duplicate button, name the
Duplicate configuration "Proxy", and click on OK to create the new configuration.
d.Click on the new configuration ("Proxy") to highlight it as shown below, and
click the Make Active button.

e.Change the settings in the TCP/IP control panel window until they match the ones
shown below.
IMPORTANT! To get a dialog box like the one below, the User Mode will need to be set to "Advanced" or "Administration". (Do this by going to the Edit menu, selecting User Mode, and clicking on the Advanced or Administration radio button.)
NOTE! The IP number will change depending on which Client computer you are setting up. If you have only one Client computer, set it to 192.168.0.2 as shown below.
If you are setting up the second NIC in the Sharing computer, set the IP address to 192.168.0.1.
NOTE: Make sure you select the correct Ethernet card when setting the IP address. The MacOS doesn't display any information about the Manufacturer of the card in the TCP/IP Control Panel. It just identifies the card by Slot Number. So you may have to experiment with the settings or try to read the Slot Number information on the Mac motherboard to determine which card is which.

f.Click on the Options... button. Select Active and make sure the Load only when
needed box is unchecked. Click OK to close the dialog box.
g.Quit the Control Panel. Your TCP/IP is now set up.
Using the ping command.
NOTE: The Mac may not respond to ping localhost. It should respond to ping 127.0.0.1.
Make sure you wait about 30 seconds before trying to ping the Mac that you just configured TCP/IP on. This allows the Mac to register the change on the network.
Monday, November 24, 2008
AZTECH 605 & cara setting speedynya
Yang perlu dilakukan sebelum modem disetting untuk speedynya adalah CEK dulu DSLnya(sudah dapat sinyal apa belum ??) kalau belum nyala hijau lampunya jangan diteruskan settingnya karena akan percuma modem tetap tidak bisa digunakan buat konek ke internet, yang perlu di cek adalah sbb :
1. pastikan kabel telepon sudah masuk ke modem, jika masih tdk bisa...
2. Tes line telepon yang di pake modem dengan Pswt Telpon (ada nadanya apa nggak ?? )
3. kalau ada nadanya cek Splitter (sudah bener ada di posisi DSL/modem) atau lepas
saja splitternya kalau seumpama ragu (tanpa splitter).
4. lampu DSL masih tidak nyala ? cek / pakai kabel pertama dari TELKOM (dari KTB
Telkom)
5. Blum nyala juga lampu dslnya ?? Laporkan saja ke TELKOM bahwa sisi jaringan
Speedy anda masih belum bisa/tdk ada sinyal DSLnya.
dan jia sudah dapat sinyal DSL lanjutkan dengan setting modem.
1. Buka wes browser ketik alamat modem 192.168.1.1 (default)
2. user : admin - password : admin (default)
3. masuk ke menu WAN - Quick start
4. masukkan username speedy anda ( jangan lupa kasih @telkom.net dibelakang usename)
5. Password speedy dari Telkom harus diketik Sesuai (sensitive key/besar kecil huruf)
6. klik tombol submit di bawah.
7. setelah selesai Submit jangan lupa Klik SAVE SETTING (agar settingan tdk hilang)
8. terakhir pilih menu Restart router (untuk reboot modem)
kalau lampu Internet sudah nyala berarti Speedy sudah bisa di gunakan.
INDIKATOR LAMPU MODEM AZTECH 605 :
1. POWER : harus menayala hijau
2. LAN/Etherent : Nyala hijau (hubungan antara modem dengan PC/komputer)
3. DSL : harus nyala hijau dan tidak berkedip (Kabel/Jaringan Telpon)
4. Internet : nyala Hijau, berarti Username & Password speedy sudah benar. kalau menyala Merah berarti ada kesalahan antara Username atau Password speedynya.
Wednesday, November 19, 2008
Setting Routing Internet Dengan Intranet
Berikut ini adalah cara setting untuk menggabungkan Internet dengan Intranet, sebagai contoh saya pakai modem Adsl dan menggunakan Speedy dari Telkom Merk Billion BIPAC 5210S. dan untuk class Ip intranet saya asumsikan menggunakan Ip computer saya adalah 10.96.7.59 dan Gateway Intranet adalah 10.96.7.1 serta IP Modem masih default 192.168.1.254.
1. Masuk alamat modem http://192.168.1.254 - user : admin – password : admin
(default).
2. Sebelum memasukkan username speedy, kita setting dulu access routing yang ada di
modem. Dimana default di modem hanya untuk internet saja.
Masuk ke menu Advanced Setup – Routing - Klik tombol add route
Seperti gambar berikut :

Destination IP Address : masukkan class IP Intranet
IP Subnet Mask : 8 saja
Gateway IP address : IP gateway yang akan diakses Intranet
Selanjutnya klik tombol Save.
Sehingga akan terlihat seperti berikut :

4. Ganti IP address default Modem (192.168.1.254) menjadi class IP Intranet (ex.
10.96.7.111) dari Menu Interface Setup – LAN. matikan saja DHCP Modem supaya
tidak mengganggu Ip intranet Komputer lainnya.

Sekarang IP modem sudah ganti – masuk ke modem dengan alamat IP modem yang baru. ( ex. 10.96.7.111 )
5. Lanjutkan dengan memasukkan username & password Speedy.
Dari Menu Interface Setup – Internet, Seperti gambar berikut :

Lalu klik tombol save.
6. Selanjutnya ganti Ip gateway di computer dengan menggunakan Ip Modem ( ex.
10.96.7.111 ).
7. Sekarang Intranet & Internet Speedy sudah bisa di akses bersamaan dari computer
anda tanpa harus mengganti-ganti IP gateway computer.
Selanjutnya kalau anda ingin supaya computer kantor anda bias diakses dari Internet dimanapun, termasuk dari rumah.
Anda harus menambahkan settingan di modem speedy anda, dan langkah-langkah yang harus lakukan adalah sebagai berikut :
1. Matikan firewall yang ada di Modem.
Masuk menu Advanced Setup – Firewall – pilih Disable – klik save. Seperti gambar
berikut ini :

2. Masuk ke menu Advanced Setup – NAT – Virtual Server :

Contoh dengan Remote Desktop :
Masukkan IP computer anda di kolom LOCAL IP Address dengan Port 3389 (default
windows).
3. Jangan lupa Klik tombol Save.
4. Jangan lupa untuk mengaktifkan REMOTE DESKTOP di computer anda, cek dari menu
klik kanan My Computer – Propertis – Remoter.Dan pastikan menu
Allow users to Connect remotely to this computer sudah di tandai.
5. jika belum bisa matikan (disable) Firewall di computer anda.
Dan untuk masuk ke computer anda yang ada di kantor dari rumah gunakan IP WAN speedy di kantor sebagai alamat IP address untuk remote.
download Artikel lengkap bisa menghubungi saya lewat email... he..he..he..3x :)
Selamat mencoba……
Setting modem Sanex SA5100
cara setting modem sanex SA5100 untuk speedy :
1. Masuk alamat addres modem " http;//192.168.1.1 "
2. User modem : admin - password: admin ( default modem )
3. masuk ke menu wizard
4. pilih setting PVC B , password : "enter" - klik next
5. masukkan username & password speedy :
- username : 1523xxxxxxxx@telkom.net
- Password : xxxxxxxxxx
6. klik finish
tunggu beberapa saat modem sanex sedang melakukan reboot.
kalau lampu data sudah menyala berarti Speedy sudah bisa digunakan.
Cek Indikator Modem Sanex SA5100 :
1. lampu Power : pertama modem On akan nyala merah terus akan berubah menjadi Hijau
2. Lampu Link : menyala jika lampu Power sudah nyala hijau dan Sinyal DSl dari
TELKOM sudah sinkron dengan modem.
jika Lampu link tidak Menyala pada kondisi Power Hijau, cek
Instalasi kabel Telepon di rumah, jangan sampai ada perangkat
tambahan selain splitter modem. kalau ada harus di bypass dulu.
jika masih belum bisa nyala minta tolong aja sama orang TELKOM
untuk cek jaringan di luar rumah.
3. Lampu DATA : menyala jika lampu LINK sudah menyala penuh warna hijau dan tidak
berkedip. lampu data ini menunjukkkan USer & password speedy sudah
diterima di server Speedy. hati2 dengan pengetikan huruf besar
kecil Password.
4. Lampu LAN : lampu indikator koneksi antara Modem dengan Komputer.
Tuesday, November 18, 2008
Setting modem Adsl untuk Speedy di Jawa Timur
pertama sebelum setting modem pastikan dulu lampu DSL di modem sudah menyala diam/penuh dan tidak berkedip.
lampu indikator DSl menunjukan bahwa antara modem dengan DSLAM Telkom sudah sinkron. jadi kalo lampu DSL masih berkedip nantinya akan percuma modem di setting karena tidak akan bisa connect Speedynya...:)
kalau sudah dapat sinyal DSLnya lakukan langkah berikutnya yaitu mensetting Modem, yang perlu di lakukan adalah sebagai berikut :
1. Ketik alamat adress modem "http://192.168.1.1"

2. Klik menu "Quick Setup"
3. user Modem "admin" password "password" (default)
4. masukkan username speedy (contoh: 152xxxxxxxxx@telkom.net)
5. ketik password speedy ( hati2 harus diketik sesuai yang ada/hurus besar ketik besar dan huruf kecil harus diketik kecil)
6. klik save/submit ( setelah klik tunggu beberapa saat modem sedang reboot )
kalau lampu indikator di modem sudah menyala sampai di lampu internet berarti speedy sudah bisa digunakan.
selamat mencoba.
ada lagi cara setting modem ini untuk bisa merubah MTU di modem, nanti akan di saya teruskan
Nice blog and contenet.An important point after buying a device Corega (or even before the purchase) is to read its user manual.If you read manual so visit this blog https://www.evask.ru/.
BalasHapusNice blog and contenet.An important point after buying a device Corega (or even before the purchase) is to read its user manual.If you read manual so visit this blog evask.ru
BalasHapus